
Winter is here and whether you love or hate the cold that comes with it, one of the greatest gifts of the winter season is the time that families get to spend with one another. While the abundance of holidays and end-of-year get togethers are often a source of nice moments and memories, it’s also easy to feel a little bit cooped up—particularly with little ones running around. We would love to share with you some holiday activities to do at home with your family to enjoy these times home with your family.
Let’s take a look at five activities/crafts you can do at home this winter with your family:
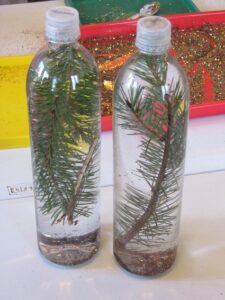 Pine Needle Discovery Bottles
Materials needed: water, pine needles, bottle and hot glue.
To start your activity, head outside and start looking for some pine needles that you would fit inside a water bottle. Once you have found your pine needles, head inside and place these pine needles inside your water bottles. Next, fill your bottle up with water until the water is to the top of the water bottle. Once it is complete full, you will then take hot glue the secure your lid. You will see the the pine needles are magnified by the curves of the bottles which really gives an interesting perspective of the pine needles!
 Sparkly Snow Writing Tray
Materials Needed: white salt, tray, white glitter, pencil or writing utensil
To create this sparkly snow we simply poured some fine white salt into a white snack tray and then sprinkled over lots of white glitter, which made it sparkle wonderfully. Now use your writing utensil to write in your sparkly snow and enjoy this sensory activity!
Snow Puffy Paint Recipe
Materials Needed: white glue, shaving cream, vanilla essence, and bowel.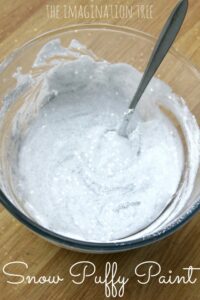
Make some glorious Winter art with this sparkly, snow puffy paint recipe! Using shaving cream and white glue, this paint dries thick and puffy without needing to be heated in a microwave. Add in some vanilla essence for a beautiful scent too! Once your snow puffy paint is created, it’s time to have some fun and get creative!
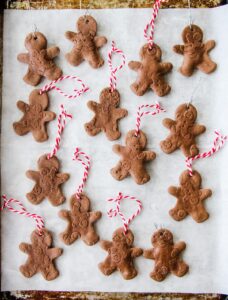 Gingerbread Ornament
Materials Needed: 1 cup flour, 1/2 cup salt, 2 tbsp ground cinnamon, 1 tbsp ground ginger, 1 tsp ground cloves, 1/2 cup water.
Instructions:
- Preheat the oven to 250 degrees F
- In a mixing bowl whisk together the flour, salt and spices
- Then using a mixer, slowly add the water and mix everything until fully combined and you end up with a loose ball.
- Remove the dough from the mixing bowl and shape it into a ball. Then flatten it into a circular disk
- Lay out a sheet of parchment paper, and place your disc of dough on top of it.
- Then using a regular rolling pin, roll out the dough to 1/4 inch thickness. Tip: If the dough sticks to the rolling pin, lay a piece of parchment paper over the dough then roll it out.
- If you want to emboss the dough with an embossed rolling pin, now is the step to do so. Remove the top sheet of parchment paper if you’re using one. Then smooth out the dough with one last sweep of the regular rolling pin,
- With your embossed rolling pin, use a bit of force as you roll over the dough, pressing the rolling pin down firmly into the dough as you roll it. And move quickly or the dough will stick to it.
- Now using your cookie cutters, cut out the dough into shapes.
- Keep rolling out the small scraps of dough and make more ornaments until all of the dough is used.
- Lay your ornaments out onto a parchment paper lined cookie sheet.
- Using a straw or the end of a chopstick, make a hole somewhere on the ornament so it can be hung. Tip: the hole will close in a bit as it’s baking, so make it larger than you think.
- Then flip over the ornaments and lay them FACE DOWN on the cookie sheet.
- Bake at 250 degrees for about 2 hours
- After baking you will likely notice that your ornaments may have a white tinge to them, that’s just the salt that rose to the surface during baking. To get rid of this, once the ornaments cooled, rub them with a bit of vegetable oil and they will return to their dark color.
- Run a piece of ribbon or twine through the hole and hang!
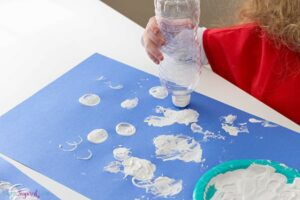 Winter Snowball Craft
Materials Needed: water bottle, white paint, container for your paint & construction paper
All you will need to do is dip the top of your water bottle in the paint and start making your snowballs on your construction paper however you would like!
We hope you enjoy these five winter and holiday activities at home with your family this year!